fbpx

Lesson 5: Introduction to Path Finding Algorithms with LabRider

Introducing LabRider

Hi! I’m LabRider and I work in a hospital. My mission is to deliver medicine in the shortest time possible. Hospitals are crowded places with many obstacles. Luckily my creators provided me a map of the clinic which I can use to calculate the fastest route. My job is critical for the health of the patients so we’ll need to get started right away!

Introduction

We will program our robot to find the shortest path between two points. We will start at the end point and mark it as 1 on the map. Then we will fill each tile which is next to the 1 with 2s. Then we will fill each tile which is next to a 2 with 3s. We continue like this until we have reached our start point. This is called a flood-fill algorithm. See the image below. Now our robot can follow the correct path by always moving to the next smallest number. This is similar to the HotRider lesson except you will be calculating the path instead of having it set up for you.

Getting Started

  • Start the simulation.
  • The map is made from 12×10 square tiles and each tile has an area of 1m2.
  • When we set a number for a tile the number will appear.
  • We will write an algorithm to follow descending numbers which leads us from the start to the finish.

Robot Commands

  • robot.move_forward() – Moves the robot 1 tile forward.
  • robot.turn_right() – Rotates the robot 90° clockwise.
  • robot.turn_left() – Rotates the robot 90° counter-clockwise.
  • robot.move_backward() – Moves the robot 1 tile backward.
  • map.width, map.height – Variables which define the map’s width and height.
  • map.startX, map.startY, map.finishX, map.finishY – Variables which define the start and finish coordinates for the current path.
  • map.value[x, y] – Used to read/write the value at coordinates (x, y).
  • map.blocked(x, y) – True if the tile is a wall.
  • robot.is_ok() – True when the simulation is running.
  • robot.front, robot.center, robot.left, robot.right – These variables give you the current sensor values of the neighboring tiles.
  • robot.posX, robot.posY, robot.dir – Only needed for the challenge. Variables which contain robot’s position and angle information.

Checkpoints

Checkpoint #1 – Initialization of the tiles

The first thing we will do is initialize the map so all the walls have value -1 and all of the other tiles have value 0. We will have a for loop over x and another for loop over y so we set each tile on the map.

  • Try adding the following code and fill in the missing parts.


for x in range(0, map.width):

    for y in range(0, map.height):

        # Use the map.blocked(x,y) method to finish

        # this code and obtain the image above.

        # Use map.value[x,y] to set numbers.

  •   Run the simulation and check that the values match the image above. Values set to 0 will not appear.


Checkpoint #2 – Set the finish point to 1

Our algorithm will begin with the finish point and set it to 1. Then flood fill until we reach the start point. You may be wondering why we don’t begin with the start position. After we get the algorithm working, you may see why filling backwards makes things easier.

Try adding the following code:
fill_value = 1

map.value[map.finishX, map.finishY] = fill_value

  • Run the simulation and check that the values match the image above. We don’t show 0 values for clarity.


Checkpoint #3 – Filling tiles adjacent to 1 with 2s

Now we will set all tiles to value 2 if they touch a tile with value 1. We need to check each of the four neighbors.

  • Try adding the following code and fill in the missing parts.


for x in range(0, map.width):

    for y in range(0, map.height):

        if map.value[x, y] == fill_value:

            # Check each of the 4 neighbors. If they have

            # value 0 they are unset and you should set them to fill_value + 1.

            # Hint: The neighbor to the right has coordinates (x+1, y).


  •   Run the simulation and check that the values match the image above.


Checkpoint #4 – Flood fill until we reach the start position.

Now we want to make the process repeat until we reach the start position. We can use a while loop which stops when the tile at the start position is no longer set to 0. For each iteration of the loop, we will increase the value of fill_value.

  • Try adding a while loop in front of your x and y for loop, as shown below. You will need to indent everything.


while map.value[map.startX, map.startY] == 0:

    # Your x and y for loops.


  •   Now you need to increase fill_value by 1 for each loop iteration. Can you determine how and where to do this?
  • Run the simulation and check that the values match the image above.


Checkpoint #5 – Use the sensors to complete the first path.

  • This step is almost identical to what you did for the HotRider lesson. One difference is the numbers are descending instead of ascending. Use your sensor values to always move to the next smallest number. For now just do the first path from A to B. We will do the rest in the next step. Start your while loop like this so that the loop will end when you reach B.


while not robot.is_arrived():


Checkpoint #6 – Use the sensors to follow all of the paths.

  • LabRider is different than HotRider in one important way. We need to redo our map calculations for each step. Put all of your code for setting up the map and driving the robot inside one big while loop as shown below. You will need to indent everything.


while robot.is_ok():

  •     Did your robot get stuck when it finished the B to C path. You might have forgotten to check if the tile behind you is the right destination. What should the robot do?


Challenge: Follow the path without using the sensors.

To make the robot follow the path without using the sensors, you will have to read the values in the map directly. This will be a challenging problem to solve. With the sensors you can simply check your right sensor to get the value of the tile to your right. But to read the map instead of the sensors, you have to know what coordinates are to the right of the robot. This depends on the current angle of the robot. The following examples are given to help you get ready to solve this problem.

Suppose the robot is at position robot.posx = 1 and robot.posy = 1, as shown in the above image. The robot has angle robot.dir = 0. What coordinates are in front of the robot? To the right of the robot? See the following and make sure it makes sense.

Front  (2,1)

Right  (1,0)

Behind (0,1)

Left   (1,2)

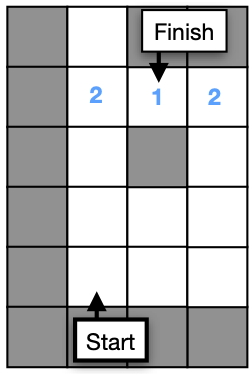
Now the robot is turned to 90° (pi/2). What coordinates are in front of the robot? To the right of the robot? See the following and make sure it makes sense.

Front  (1,2)

Right  (2,1)

Behind (1,0)

Left   (0,1)

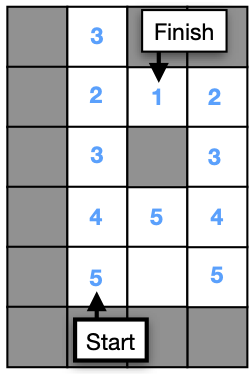
Do you notice any patterns in the above results. How do the results change after we rotated the robot? We would like to write an algorthm for the coordinates to the front, right, back, left – for any angle.

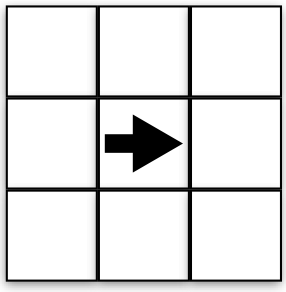
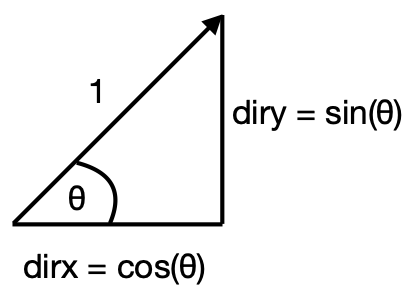
Now let’s think about the angle of the robot. See the above image for a reminder about how sin and cos work.

For θ = 0°, what are dirx and diry? (1,0)

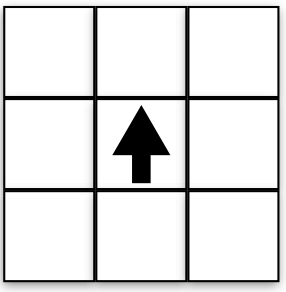
For θ = 90°, what are dirx and diry? (0,1)

For θ = 180°, what are dirx and diry? (-1,0)

For θ = 270°, what are dirx and diry? (0,-1)

In python we can get the above values for dirx and diry as shown below. We used the int() method to round the decimal numbers to be integers.

 dirx = int(math.cos(robot.dir))

  diry = int(math.sin(robot.dir))


Now see if you can complete the following table. Then you can try to use the table to write an algorithm to follow the path using the map intead of the sensors.


x

y

Front

Right

Back

Left

x + dirx

x + diry

x + ____

x + ____

y + diry

y + ____

y + ____

y + ____


Challenge (Difficult): A* Path Finding Algorithm

This challenge offers a great opportunity for those who want to improve their coding and research skills. The path finding algorithm we have developed used a method called Flood Fill. Another very popular path finding method is A* (pronounced “A Star”). Can you write a working A* algorithm? You will want to research to find more information about how it works. You can see an informative animation down below:

Loading...