Lesson 7: Arrays with LineRider
Introducing LineRider
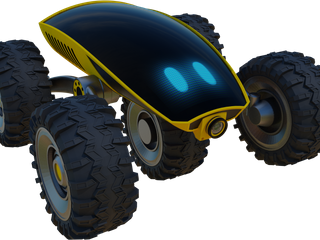
Hi! I’m LineRider. I’m a racing robot and that’s the best thing I do. My task is to finish the course as soon as possible, beat my opponents, and achieve a glorious victory. Have you ever been in a real race? It is very exciting and adrenaline filled. Because of this, I sometimes get excited and wonder what to do. The race course is marked by a line. Can you help me follow it? Let’s start!
Introduction
In this lesson, we will learn about arrays and continue to improve our skills with feedback algorithms.
- If you want to store a lot of elements together which are all the same type, you need an array. Below are some examples of arrays:
numeric_array = [1, 5, 7, 9, 2, 8, 2]
string_array = [“cat”, “dog”, “turtle”, “wolf”]
boolean_array = [True, False, False, False, True] - In the example above, the array numeric_array has length 7. We can read the 3rd element like this:
value_of_3rd_element = numeric_array[2]
Notice that to get the 3rd element, we pass index 2.
In python, the first index has index 0.
numeric_array = [1, 5, 7, 9, 2, 8, 2]
index = 0, 1, 2, 3, 4, 5, 6
Getting Started
- Start the simulation
- Notice the line on the track. We will write an algorithm to follow this line.
Robot Commands
- robot.is_ok() – True while the simulation is running.
- robot.move(v) – Set robot speed v [meter/sec].
- robot.rotate(ω) – Set robot angular velocity ω [radian/sec]. Positive ω is counter-clockwise (CCW). Negative ω is clockwise (CW).
- robot.image_data() – Used to the get the image from the camera.
- robot.get_sensor_data() – Used to read the pixels of the camera image. More details below.
Checkpoints
Move the Robot
- Our robot is not moving. Try adding the following code:
while robot.is_ok():
robot.move(1.0)
- Run the simulation and observe the robot’s motion.
Accessing the Camera
Your robot has a camera. Let’s have a look.
Click the video camera button.
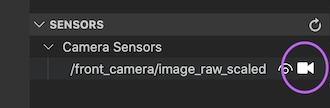
You will see the streaming camera image and a white line moving on and off the camera.

- The camera looks out in front of the robot.
Notice that the white line is centered on the image when the robot is lined up with the white line on the course.
Your goal is to write an algorithm so the robot can follow the course.
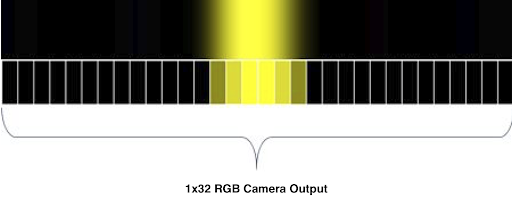
Now it is time to start thinking about how we will write an algorithm to follow the line. The camera has a resolution of 1×32, meaning that it can only scan a line. The line is represented by 32 pixels stored in an array of brightness values called: self.sensor_row
The indices of the array go from 0 to 31. You can get the 10th element like this: self.sensor_row[9]
- For a first step, let’s look at the values of the camera pixels.
Try changing your code to look like this.
while(robot.is_ok()):
sensor_row = robot.get_sensor_data()
print(sensor_row)
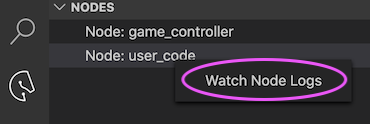
- The last line prints the 32 values of the camera pixels. To see the log we need to open the terminal. Make sure the simulation is running, right click Node: user_code and select Watch Node Logs
- While many elements of this array have a value of 60, the elements in the middle section have a value of around 254. The main reason for this is that gray scales are shown on a scale of 0 to 255. While the dark gray base takes a value of about 60 in this scale, our white line takes a value very close to 255.
Using the Camera Image
- Now that we can get data from the camera, it’s time to determine the position of the line. Add the following code to your existing code to locate the line in the camera image:
max = 0
index = 0
for i in range(0, len(sensor_row)):
if sensor_row[i] > max:
max = sensor_row[i]
index = i
- Try adding a print command so you can look at the values for max and index. You can remove the previous print command.
- Now think about the above code we added. First we added a variable called max and set it to 0. We also added a variable called index and set it to 0. Then we looped through the 32 pixels and checked each one. If the pixel was bigger than the current max, we update our saved max and index. When we are done, index will be set to the pixel which is brightest.
- In WallRider we used the difference between the right and left sensor to decide whether to turn left or right. In this lesson, the image replaces the sensors. If the brightest pixel has index which is larger than the middle index we need to turn right. If the brightest pixel has index which is smaller than the middle index we need to turn left.
- There are 32 pixels and the first one has index 0 and the last has index 31. What is the index of the pixel in the middle?
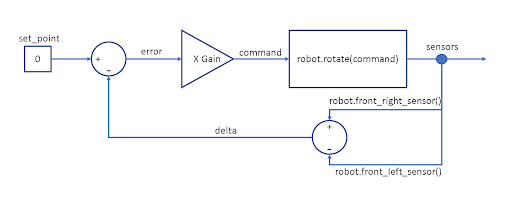
- Let’s look again at the feedback loop diagram we showed for WallRider:
- Try adding the following code to complete your algorithm:
set_point = len(sensor_row) / 2
error = set_point – index
gain = 0.1
command = gain * error
robot.move(1.0)
robot.rotate(command)
- Notice that set_point was 0 for WallRider but now we set it to the middle pixel index for the image.
- Run the simulation. Notice our robot can follow the line now.
Make the Robot Smarter
- Can you improve the speed by making the robot slow down for turns? Perhaps only for sharp turns?
- Similar to WallRider, you’ll want to reduce your movement speed based on how large your command is. Don’t forget to put in a check to avoid making the movement speed too small or negative.
Finish the course in less than 90 seconds.
- Now try and see if you can finish the course in less than 90 seconds.
- Adjust your algorithm and test it.
- You may also want to try adding code to remember what your robot was doing, in case it loses the line. Then it can keep doing the last action until it hopefully finds the line again.
Challenge
Let’s see who will be the fastest on the course. Using the time metric at the bottom of our screen, let’s see who can finish the course fastest in the group? 3, 2, 1, Start!