Lesson 6: Introduction to Feedback with WallRider
Introducing WallRider
Hi! I am WallRider. I am a guardian robot and my task is report any potential dangers or intruders to the command center. My mission for today is to patrol a special part of The Great Wall of China. This part is off limits to tourists for security reasons. Have you ever visited The Great Wall? It is huge, and it has an enormous length, making it difficult for humans to patrol. Luckily I am here to help. I have a unique design suitable for the environment including powerful electric motors. I don’t have a map of The Great Wall, but luckily I am equipped with useful sensors. I have sensors located to the right, left and front of my chassis which tell me how far I am from the walls. But I don’t have an algorithm to use these sensors and make decisions to drive around. Perhaps you can help me get set up properly?
Introduction
Today we will learn about feedback. This is an important topic for robotic systems. A robot can react to changes in its environment by using different types of sensors. For example, a robot can sense its distance to a surrounding wall by using an ultrasonic distance sensor and react for different situations:
- If it is close to a wall, it may react with a fast rotation command away from the wall.
- Or if it is far from the wall, it may prepare for the turn by rotating slowly.
The robot takes measurements with the sensors and then makes decisions. This changes the next measurements and the robot makes new decisions. This is called a feedback loop.
There are many methods to write feedback control algorithms. However some techniques are common and used as building blocks for more complex algorithms. Part of the fun of feedback algorithms is to tune your algorithm so the robot has intelligent behavior. If you learn how to write a control algorithm for one robot, then you can develop similar algorithms for other types of robots and applications.
We will also introduce the concept of continuous-time commands with WallRider. Before we had discrete robotic commands such as “move 1 meter forward” or “rotate 90 degrees clockwise”. Continuous-time commands tell the robot how fast to move or how fast to turn. So we can set the speed as 1 meter per second, instead of saying move exactly 1 meter forward.
Getting Started
- Start the simulation.
- Notice that the robot will encounter areas of increasing difficulty. We can see how different algorithms perform in the different areas. At the end we will encounter right-angle turns in the restricted area which introduce new challenges.
Robot Commands
- robot.is_ok() – True while the simulation is running.
- robot.move(v) – Set robot speed v [meter/sec].
- robot.rotate(ω) – Set robot angular velocity ω [radian/sec]. Positive ω is counter-clockwise (CCW). Negative ω is clockwise (CW).
- robot.left_sensor(), robot.right_sensor(), robot.front_sensor() – Sensors give you the distance to the nearest wall.
Checkpoints
Checkpoint #1 – Moving the robot for the first time
- Our robot is not moving. Try adding the following code:
while robot.is_ok():
robot.move(1.0)
- Run the simulation and observe the robot’s motion.
- Notice that 1.0 is not the distance the robot will move. Instead we are setting the speed of the robot. This is something new. Can you think of reasons why working like this can sometimes be better?
Checkpoint #2 – Rotating the robot
- Now let’s try making the robot turn. Try replacing the move command with the following code:
- robot.rotate(0.78) Run the simulation and observe the robot’s motion.
- With this command our robot will rotate around its center point with 0.78 radian/sec, which is roughly 45 degrees/second. It will take around 8-9 seconds for the robot to complete a full revolution.
- Try changing your code so you have the move command followed by the rotate command. Run the simulation and observe the robot’s motion.
- Unlike previous lessons, your commands do not mean to move first (and stop) and then rotate (and stop). It means to continuously rotate while moving forward with a speed of 1.0 m/sec.
- What do you think will happen if you change the order of the commands? Try it and see.
- What do you think will happen if you change the rotate command to a negative number? Try it and see.
Checkpoint #3 – First feedback algorithm
- Now we will implement our first feedback algorithm. WallRider will receive information from its sensors.
- Our ultrasonic sensors report the distance between the robot and the surrounding walls. WallRider has 3 sensors located to the left, right, and front of the robot. These sensors tell you the distance to a wall or obstacle. For example, if the number for the left sensor is small compared to the right, then the robot is closer to the left wall. In the diagram below the robot is closer to the left wall. The left sensor has value 1.7 meters and the right sensor has value 4.2 meters.
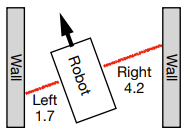
- Should the robot turn right or should it turn left in the diagram above? Or maybe it should wait until it gets closer to any wall? These are the questions that need to be addressed while developing a feedback algorithm.
- Now let’s try our first feedback algorithm.
while robot.is_ok():
delta = robot.front_right_sensor() – robot.front_left_sensor()
set_point = 0
error = set_point – delta
gain = 1
command = error * gain
robot.move(1.0)
robot.rotate(command)
- In the above code we created a variable called delta which is the difference betwen the right and left sensors. When will delta be positive? When will delta be negative?
- We also created set_point and set it to 0. This is the value we want the robot to have for delta. If delta is 0, then the robot is halfway between the walls. We calculated error as the different between the set_point and our current delta
We also created something called gain. For now we set this to 1.0. But we can change this number to make the robot respond faster or slower. What would happen if we made this 0? What would happen if you made this too big? You can try this.
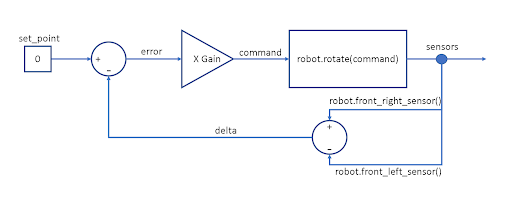
- Feedback loops are often represented as diagrams like the one above. Don’t worry if this doesn’t make sense right away. We want to help you start thinking like an engineer working on these types of problems. Notice how delta and set_point meet to make error. Then error is multiplied by gain to make the final robot command. Notice how the sensors send the measurements back into the loop. It goes around and around which is why it’s called a feedback loop!
Checkpoint #4 – Try speeding things up
- In your feedback algorith, try changing the move speed from 1.0 to 3.0:
- robot.move(3.0) Run the simulation and observe the robot’s motion.
- The robot is moving faster now. Does it still work properly? Do you think it will be harder to write a feedback algorthm for a slow robot or a fast robot?
Checkpoint #5 – Make the robot smarter
- Let’s try adjusting our algorithm so the speed depends on the feedback. If we are in a good place close to the middle, we can go faster. If we are close to a wall we slow down. Can this help us get a faster time overall?
- Try changing your move command to be the following two lines:
slow_down = abs(command)
- robot.move(4.0 – min(3.0, slow_down)) Let’s think about what the new code is doing.
- We added a variable slow_down which is the absolute value of command. We are using the absolute value because we want to slow the robot down if it’s turning quickly to the right or left. It doesn’t matter whether it’s right or left, it just matters how fast the robot is turning.
- We changed our movement speed to use slow_down. However we need to make sure we don’t make our movement speed too small or negative. So we used min to make sure the final calculation never gave us a speed less than 1.0.
- Can you see how min works? Pretend slow_down is equal to 3.0. What would the movement speed be? Pretend slow_down is equal to 8.0. What would the movement speed be?
- We could multiply slow_down by a number. We could change min so the slowest speed is 2.0. We can do all kinds of things. This is not the best answer. It’s just one answer to help you get started exploring feedback.
- Run the simulation and observe the robot’s motion.
Challenge
It is time for a little challenge! Who can finish the stage in the shortest time? Our goal is clear, we will crush the gas pedal! Let’s see who can be the fastest on the track. We have the timer in the metrics section which you can share. Ready? 3-2-1 and start!